#page { padding-top: 10px; } #page { margin-top: 140px !important; }

Using Xpand with XMon to Implement 9.1.2 or 7.1.4

The Xpand surround control unit may be configured for different monitor formats.  Currently we can implement the three following selections, there may be more that we will need to implement in the future! In all modes the outputs are only enabled when both main Input and Main Output are selected,  the outputs follow the master gain control and have individual gain trims and mutes.

Eight Channel

8 additional channels with no surround control or bass extension.

5.1/7.1/7.1.4 or 5.1/7.1/9.1.2

In these modes Xpand includes speaker routing for 5.1 and 7.1 as well as 7.1.4 or 9.1.2. Summing and Low Pass is also provided for rear left and right surround bass extension,

To switch from 7.1.4 to 7.1 - Xpand turns off top speakers

To switch from 7.1 to 5.1 - Xpand connects Rear speakers to Left and Right Surround and adjust surround levels.

To switch from 9.1.2 to 7.1 - Xpand turns off top speakers, connects Front surrounds to Left and Right Surrounds and adjust Surround Levels

To switch from 7.1 to 5.1 - Xpand connects Rear speakers to Left and Right Surround and adjust surround levels.

The 5,1, 71, and Rear BassX are available as user keys on the TMC-1 or on the Xpand App. You can select the speaker layout from the TMC-1 Menu or from the Xpand App.

XPand: A new product derived from the AMon Monitoring Interface

For the past two weeks I have been working on the software for the AMon (our new analog front end for the TMC-1). Whilst working on this we have received requests for a low cost way of adding Dolby Atmos or Auro 3D to an existing XMon system. Using the AMon hardware the XPand IU rack mount unit will add 8 channels to and existing XMon or AMon system. This will provide one input and one output with up to 16 channels.

Using XPand with the XMon and TMC-1
The XPand monitors the commands to the XMon, the dim, mute and gain follow the XMon commands.The XPand outputs are enabled when both main input and main output are selected.

Four  inputs are enough for the top speakers, by adding some switching to the XPand the remaining four inputs on XPand can be used to switch the rear speakers between 5.1 and 7.1 The TMC-1 has a user switch for this which also adjusts the surround output trim to compensate for any level change.
Using XPand to switch the surround speaker configuration between 5.1 and 7.1

When controlled by the TMC-1 individual speaker trims are available with individual speaker naming available from the USB port. When controlled by a ICON console the speaker trims can be adjusted via the USB port.

We are beta testing both the XPand and AMon in March provided the metalwork arrives on time.

A tale of four Cables Update

VGA DDC Cables should work, unfortunately not all work. We have found a source of cables that work, so far we have tested the 5m and 7m cables both of which work. We have ordered a stock of 7m cables and a sample of the 10m cable to test After our experience with a different brand of cable (see below) we ae testing all cables before shipping!

Our original tests
After testing 4 different cables we chose the best, the sample cable was only 3 meters long, we then bought a number of 5m cables for stock only to find when we tested them that they did not work! If you are purchasing your own cable be warned - some VGA cables are more equal than others.


TMC-1-Dmon: Trinnov D-Mon Remote

I have been working on the TMC-1-DMon software for the past week - it looks like I will be able to release it next week.

The TMC-1-DMon interfaces with the D-Mon via ethernet using the same protocol as the web browser interface. This will allow us to add functionality whenever Trinnov updates their software.

The initial version is an improvement on the TMC-1-Xmon interface providing added functionality and using tallies from the D-Mon allowing changes made on the web browser interface to be reflected on the TMC-1.

For the interface to function correctly the D-Mon mut be setup with the same framework as the TMC-1, the user can assign the input and output ports as required - (not all ports have to be connected). The screen shot below shows the main web browser display with the three cue inputs hidden.

The TMC-1-DMon will be the same price as the TMC-1-Penta and existing users of the TMC-1-XMon can purchase a software upgrade,

New Film Monitor Module - a Work in progress

It is the run up to Christmas, tomorrow we should receive a DMon which I will look at over the break in order to develop the ethernet interface between DMon and the TMC-1.

Whilst waiting for the DMon to arrive I worked on our new Film Monitor Module. Below is a picture of the new unit, still waiting for the front panel overlay but with fully working software.


The film monitor module is the same size as a Avid S6 fader module and may be used stand alone or in the S6. The module includes both the PD-1 and TMC-1, although separate they work together. The Pec Direct can read and build stems from Protools track name information and pass this information to the TMC-1. I plan to add an option to implement the pec/direct monitor functions in the NTP DAD AX32/Penta 720.

The monitor controller is identical to the stand alone TMC-1, the pec-direct section is based on the PD-1. To fit the pec-direct some compromises were necessary, even after saving as much space as possible I still had to lose 3 switches on the left which will involve changes in the functions of the three master switches on the right. The other obvious change is the new OLED display, big, bright and a great viewing angle.

The new 5.5" 256x64 graphical display posed one problem - what do do with all the extra display space? I always liked the DFC stem based track arm display, this inspired me to attempt a similar function in the OLED display. By labelling the stems on alternate sides I was able to fit eight 8-track. The display below shows four 6-track stems with no tracks in record.


TMC-1-DMon Progress

On Monday I visited Trinnov in Paris to determine the current status of the TMC-1-XMon interface with the DMon and define new TMC-1-DMon interface.

TMC-1-XMon
Within the limitations of the DMon - XMon interface the system worked well but it is important to realise that not all XMon functions are available within the DMon, more will be available in the future.

Talkback
The DMon has one talkback input only and the have assigned it as the External Talkback input, by default the talkback keys on the TMC-1 are for the Internal Talkback Mic (T/B 1 and/or T/B 2), You will need to change these to T/B 1x and T/B 2x to control and enable the external talkback Mic.

Note that Talkback is not available to the Headphone output.

Meters
The DMon has not yet implemented a meter output.

TMC-1-DMon
Early next year the DMon version of the TMC-1 will be available, this will connect via Ethernet to the DMon and be able to control any setting available to the DMon s/w. As more functions are added to the DMon the TMC-1-DMon s/w will be updated to match.   

TMC-1 Cue Send Display, AMon and Trinnov

TMC-1

This week I took a break from designing the AMon and looked at the Cue sends on the TMC-1.

Cue Dim

Originally when enabling talkback to a cue output I muted all other inputs. I have now added a menu (13) that allows the user to select between Mute Cues, Dim Cues and No Change. Currently the Dim is fixed at 10dB I will wait for feedback from users on this.

Cue Send Status 

I decided to indicate the cue send status of the meter screen, colour is used to indicate status as follows:-

  • Black: Cue output is enabled with No inputs selected (Cue 1 in image)

  • Green: Cue output is enabled with inputs selected (SLS in image)

  • Red: Cue output is Muted with inputs selected (Cue 2 in image)

  • Blue: Talkback is enabled and routed to this cue send (H/P in image)

Note: There are 5 cue sends on the XMon version

AMon

I am currently designing the AMon our new analog Monitor system, the AMon  or "Analogue Monitor Controller" will interface with the TMC-1. The AMon is designed for Stereo, 5.1 room and 7.1 rooms. Similar to the Avid XMon but with a number of improvements. The AMon is a 1U rack mount unit and the modular construction of the AMon will allow different versions for Stereo, 5.1, and 7.1. Here is the initial design specification (Click on image to expand!)

The AMon is designed for smaller Stereo and 5.1/7.1 rooms where the user has D2A converters and does not want to replace them with the DAD AX32.

Trinnov

On Monday I am visiting Trinnov in Paris to discuss the details of interfacing the TMC-1 to the DMon. I will post more information on the TMC-1-DMon later.

TMC-1-X~MonCable - our solution

Using a VGA cable and an interface both ends, we will supply the interfaces in two different colour boxes - Black with transformers, White without transformers for current versions of the TMC-1-XMon. The next production run of the TMC-1 will have a VGA connector fitted as standard and only one converter is supplied. We stock 5m VGA cables as shown and can supply 10m, 15m and 20m VGA cables.


Noise - the noise performance is also related to the power supply, to use the HUI interface on the TMC-1 it may be necessary to use a powered hub to remove any power supply noise generated by the computer.  

A Tale of Four Cables (Searching for a TMC-1 to XMon Cable)

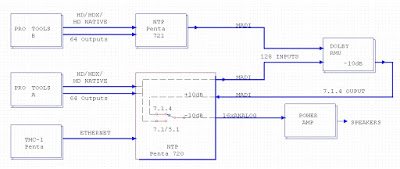
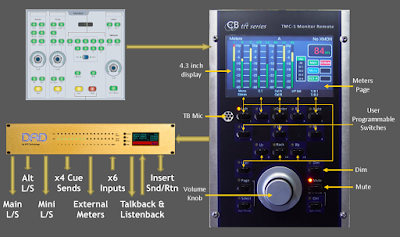
The XMon uses a single 15 pin D connector to connect with the monitor controller, the connections includes headphone, unbalanced microphone and digital control and digital metering. We like to supply a suitable cable with the TMC-1 remote so that the customer can immediately connect and use the system. In an ideal world these would all be separate cables with their own connectors but this would make it very untidy at the remote.

Cable 1 - DB15-DB15 overall screen
When we designed the TMC-1 ready made DM15-DM15 cables were available, they were not individually screened but after a resistor change the crosstalk on 5m cables was acceptable. With the 10m extension cable the cross-talk into the headphones from the meter data is annoying.

The supply of the original cable has dried up and we need a new solution. The obvious choice seemed to be to use VGA cables, although not the correct connector these have the advantage that there are 3 screened cables within the cable tha may be used for the unbalanced Headphone and Mic signals.

Cable 2 - Pro Signal VGA cable (cable marking E1199332-T AWM 2919)
Widely available in both Male-Male and Male-Female extension cable format, these cables were specified as having 14 connections + shield, unfortunately when tested there were only 10 connections. The cable still works with X-Mon by leaving out the Midi connections and communicating via RS-422.

Cable 3 - (cable marking AWM Style 2919)
Sourced from our connector supplier this cable has 14 connections - but the grounds of the 3 screened cables are connected in the cable causing a ground loop that resulted in a low frequency noise in the headphone feed.

Cable 4 - (Clever Little Box LPVGA-M/M-5.0M-FP)
The best cable that we have tried so far about 50% more expensive than Cable 2, this cable is blue, more flexible than Cable 2, has 15 connections and nice small 15 way connectors. We tried a 3m cable which it worked well with and without the transformers. The cable is available in lengths of  1,3,5,10, 15 and 20 meters. We plan to stock the 5 meter cable and supply other lengths to order.

We now have the 5m Cables and THEY DO NOT WORK!!!


Daniel had spotted a reference to Icon-Xmon noise issues
http://absolutecad.typepad.com/over_the_wires/tips-tricks/

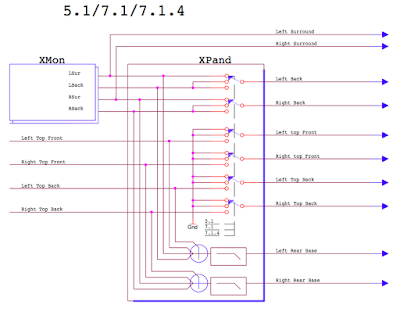
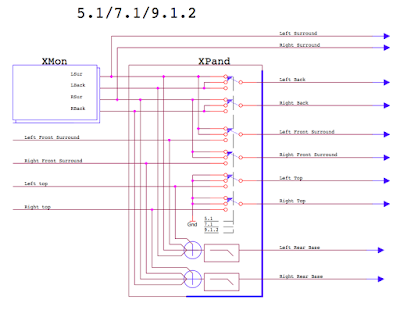
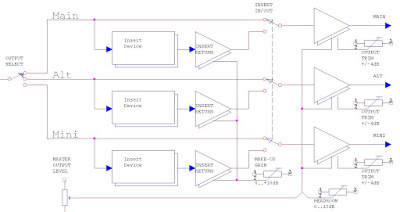
Reading the article we decided to try using transformers in the audio path using the transformers at one end for ground isolation. For cost and size considerations we used  600ohm telephone transformers . We found a marked improvement in noise levels on all cables, the only worry is the bass performance of such small transformers on the headphone feed.

Conclusion
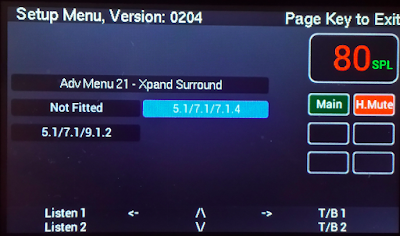
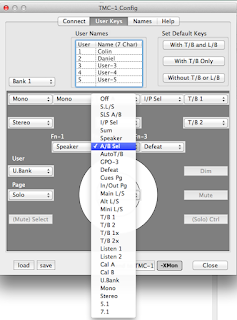
The next revision of the TMC-1-XMon with have a HD15 VGA connector fitted in place of the DB15 connector and be supplied with a conversion box for the X-Mon connection. The Conversion box will have transformers fitted in the audio path and optional links to swap the digital connections between Midi and RS422. We will supply Cable 4 as an optional extra.

TMC-1 and DAD DX32 Integrating Pro tools, Trinnov MC and Apogee Symphony

A interesting recent TMC-1 installation at Sound Generation mixed a number of different interfaces and demonstrates the insert capabilities of the TMC-1/DAD combination.

The DAD provides the Pro Tools interface and audio routing matrix, the Apogee Symphony provides A2D and D2A conversion. The Trinnov MC is used for room equalisation and bass extension. The Trinnov MC is connected as a speaker inserts and be enabled/disabled by the TMC-1.

Simplified System Block Diagram

The Main and Alt output can be up to 64 channels wide and the Mini output up to 12 channels wide.

Input/output Configuration

First name the input and output Modules  (Module Names) and define channel count

Once the Input and output names are defined the input and output channels are defined by selecting the appropriate module and channel, then a simple mouse click will assign this to the selected input/output

Define the Inserts

Name each insert, select the input and output modules then click on each insert input and output to assign. The channel selection auto-increments.

Define Stereo/2.2 Main Outputs and assign Inserts

Define 5.2 Alt Outputs and assign Inserts

Define Stereo Mini Outputs and Assign Inserts 

Define Main Inputs

The alt input was not defined

Define the Input Pallet

Define Cue Inputs

Define Cue Outputs

Define Talkback and Listenback

Once defined the parameters are sent to the TMC-1 which then defines the routing within the DAD DX32 directly.

Gain and Calibration

There are several points to consider in configuring, the TMC-1, the global settings are made in the TMC-1 Advanced Setup menu, the input and output trims are only available when in calibration mode

Insert and Gain Control

SPL display:

85spl represents Unity Gain when all trims are set to 0dB

Input trim: -10 to +20dB in 1dB steps

In digital systems normally there is usually no need to control the inputs but it is sometimes necessary (see a previous blog on how 10dB gain is used with the Dolby RMU to compensate for the 10dB loss.)

Output Trim: +/-4dB in 0.5dB steps

Each individual output has a gain trim

Digital Headroom: 0 to 10dB in 2dB steps

This is a global setting  on all outputs allowing equalisers to be placed in the chain.

 Insert Makeup Gain: 0 to 10dB in 2dB steps

This is a global setting for all inserts to compensate for any loss.

Where analog output cards are used in the AX 32

Analog O/P for 0dBFS: +6, +12, +18 and +24dB

This is a global setting for all Analog outputs

Installing a TMC-1 and PD-1 in the S6 in the Jigsaw24 7.1.4 demo room

Yesterday I was at Jigsaw24's new facility in Golden Square with Andy Brooks and Ian Duncan installing the TMC-1 and PD-1 into their S6 console for "Mix with the Pro's"( 15th of October). This was the first install of a TMC-1 in the S6 and it fitted first time! We fitted the TMC-1 in front of the PD-1, the choice is yours.

 
We had a few problems, I discovered a keyboard scan issue on the TMC1-S6 which is fixed with a few minor tweaks today in the s/w posted today. We had a silly connection problem at the end which wasted at least an hour but apart from that it was a simple install.

If you are in London on the 15th of October Daniel and I will be showing the TMC-1-Penta, you can find out more about "Mix with the Pro's" here.

Atmos, 7.1, 5. and Digital Signal to Noise

Pinewood emailed last week and asked if I would visit at the same time as the Dolby engineer and set up Theatre 6 for four standards:-  Atmos Performance, Atmos Home, 7.1 and 5.1

The front speakers were not a problem but I was concerned that the different level settings for the surrounds would reduce the digital signal to noise. The problem was caused by the gain range required to configure the surround  speakers for the different formats and speaker combinations.

The Formats

Theatre 6 has two left, two right, two left rear and two right rear surround speakers
Atmos performance uses all the surround speakers as individual point sources.
Atmos Home uses only one left, one right, one left back and one right back as individual point sources.
7.1 uses the surround speakers in pairs
5.1 combines the left side with left rear and combines Right side with right rear to make four left surround and four right surround speakers.

Setup Procedure:

1) Set up the room for Atmos performance and Atmos Home by adjusting the individual +/- 4dB trims provided by the TMC-1.
2) Set up the room for 7.1 using the global 7.1 surround trim in the TMC-1 to reduce the surround level
3) Set up the room for 5.1 using the global 5.1 surround trim in the TMC-1 to reduce the surround level.

The problem:

After calibration there eas approximately 10dB of attenuation on the surrounds for the 5.1 setup. 10dB, almost 2 bits of resolution lost, but this is not the only loss, consider the following.

1) The levels are set for 85dB SPL
2) The RMU has an insertion loss  of 10dB to allow for digital equalisation
3) Set to 5.1, on the surround channels there is a further 10dB insertion loss
4) Reduce the monitoring level to the Dolby Home level of 79dB SPL which adds a further 6dB insertion loss
5) Speaker trim range is  (+/-4dB) in the worst case there can be a further 4dB insertion loss.

The worst case insertion loss is 30dB or 5 bits, this would reduce a 16 bit signal to 11 bits. This is the case with the surround speakers in pairs, consider the possible insertion loss in a bigger studio where the surround speakers are in sets of 3, 4 or more.

The Solution:

The 10dB insertion loss in the Dolby unit is unavoidable and is required for any digital equaliser,  we have to accept this. (I would have limited the boost to a maximum of 6dB and reduced the insertion loss to 6dB but this is a design choice).

The DAD AX32/NTP Penta 720 also provides analogue gain control. I tested this for the gain control but the four 6dB relay steps cause unacceptable glitches in the audio. When used for  the speaker trims, Calibration Level adjust and surround trim the relay switching is no longer a problem!

When setup correctly the maximum extra digital insertion loss is 6dB so that when combined with the RMU gives a maximum 16dB insertion loss in any condition over the required range, a worthwhile improvement.

Update: originally I referred to "digital resolution" Florian Camerer pointed out that reducing the bit count does not reduce the resolution but reduces the Signal to Noise or dynamic range. 


IBC-2015 Hall 7, stand F06

This year we will be featuring the TMC-1 multichannel monitor controller, described by one customer as "The large console monitor controller without the large console". New this year are the interface to the NTP DAD/Penta digital interfaces to make a fully digital monitor controller r and the S6 drop in module plus a host of new software features.  Colin Broad (the designer) is on the stand to demonstrate the new features and explain how the TMC-1 can be used will all monitoring formats including a full Atmos and or Auro system.

You can see a photo of the TMC-1-S6 on my post of the 17th of July, below is a description of the two major upgrades to the TMC-1 Penta that will be released at the IBC.

Input Pallet
The TMC-1-Penta has 6 inputs, Main and Alt which can both be up to 64 channels wide, I/P1 - I/P4 which can be up to 8 channels wide. I/P1-I/P4 can now be assigned to any input from a pallet of 16 inputs. Each input on the pallet can be a different format, the monitor output is set to the correct format when the input is selected. If the Main and Alternate inputs have a maximum of 8 channels the main and alternate inputs  may also be selected from the pallet.


Note. You can program the input names for all inputs and outputs.
  
Analog Input Control
The DAD AX24 or NTP Penta 720 can be fitted with analog input card(s) with 8 inputs. The TMC-1 now has a MicLine page that allows you to meter the digital levels, control the Gain, select Mic/Line Input, Mute On/Off, phase reverse and  Phantom On/Off. When selected to Mic/Line inputs the meters display the digital input level and the PFL (Pre Fade Listen) key switches the monitoring to the selected input.


There are a number of other small improvements in the user interface, this should be the last major upgrade to the TMC-1 Penta this year. It has taken longer than I expected to make these upgrades, every time I was close to finishing I found more to do! 

I am on holiday next week and will post Beta test versions of this software for both the XMon and Penta versions when I return. It will be necessary to update the Penta Configuration software which inludes the new Pallet and Bass Management systems. You may even have to read the updated manual.


I have started on two more projects, one of which I should have finished for the AES in New York but more about that in my next post!

TMC-1 Penta 7.1.4 Case Study

The TMC1-Penta provides a framework to build your own monitor system, to design your

system you will need to specify the input/output data and the speaker groups as follows

1)  Map out the speakers

2)  Map out the Input and Output connections

Note the +10dB gain on the Dolby Return to remove any Level differences

between monitoring direct or through the RMU

3) Label modules in TMC1-Penta program and set Maximum channel count if not defined. As

an option you can add the Offset for each input

4) Label Speakers and assign channels

Note: The surround channels are checked in the corresponding Surround Column. This

allows the speakers to be assigned to the correct source when 7.1 or 5.1 are selected. To

use the LFE as a bass extension to the surround channels check the appropriate output in

the LFE column.

5) Assign Input name and channels for RMU 7.1.4 Outputs. Every surround speaker is

individually assigned

6) Assign Input name and channels for direct 5.1 and 7.1 outputs from Pro Tools,

Note. Only the main surround inputs are defined the 7.1 switch can the enable the extra surround speakers. Alternatively you can assign the extra surround speakers for 7.1 so that they are always used. 

S6 panel for TMC-1

The TMC-1 has joined the PD-1 by being available in a Avid S6 Module, the PD-1 is in a S6 Fader size module, the TMC-1 in a S6 knob size module.

Connecting the TMC-1 GP inputs to the S6 GP Outputs you can connect the S6 talkback controls to the TMC-1 and enable auto-talkback  alternatively the TMC-1-Penta will emulate a XMon for control from the S6 or D-Command.


TMC-1-Penta-S6 (Click on image to enlarge)
I kept the controls at the bottom of the panel for two reasons

  • To keep them as close as possible to the operator
  • To allow space for the connectors at the rear

7.1.4 using the TMC-1 and DAD-AX32 or Avid MTRX

This week I installed the TMC-1-Penta with a Dolby RMU, although there were one or two problems the system worked correctly. I will be modifying the TMC-1 software to provide more elegant solutions to the problems found. My to-do list has become bigger!

The last problem was interesting, as you can see from the signal flow diagram below there is a 10dB loss in the signal passing through the RMU to allow headroom for the speaker equaliser. This causes a problem when switching from 7.1.4 from the RMU to 7.1 or 5.1 from Protools.

7.1.4 and 7.1/5.1 Signal Flow (Click on image to enlarge)

10 dB of gain is added to the RMU return to make up for the 10dB attenuation through the RMU. The TMC-1 originally configured the Penta 720 with unity gain for 85 dB spl, to ensure that the speaker outputs do not clip a 10dB loss is inserted in the NTP Penta Output, This will also allow for internal summing and where digital outputs are used external equalisers.

Stress testing the TMC-1-Penta, The New D-Command Interface

Stress Tests
Last week I went to see NTP at Copenhagen in order to stress test the TMC-1-Penta Ethernet connection to prove that the connection between the TMC-1 and DAD AX32 would remain working under high load conditions. I am happy to say the the TMC-1 performed well. Even when I forced a disconnection the  TMC-1 reconnected gracefully and continued working.

The New D-Command Interface
On my return trip the flight was delayed (as usual) I used the time to prepare the software required to connect the TMC-1 as an interface between the  DAD AX32 and the Avid D-Command console or even S6 console. I finished and tested the software this week using a TMC-1-XMon to emulate the D-Command. There are no tallies in the X-Mon protocol but the meters are visible on both and all commands from the D-Command work as expected. A Tx-Rx Invert cable is required to link the 15pin 'D' connectors on the D-Command and the TMC, I will a add the details to the TMC-1-Penta Manual next week after I have installed this system in a 7.1.4 room at Pinewood.


Requests for more user functions on the TMC-1

First an apology: There was a bug in the initial postings of the latest TMC-1 software. This has now been corrected, it was only up for a few hours.

As soon as I increase functionality on the TMC-1 or any other product I get requests for even more. I am not complaining though, I am happy that customers are using the unit and are providing feedback. Owen who runs The Bridge Sound and Stage has provided me with good feedback on using the TMC-1 in a stereo music environment. As I have not worked in music studios for 30 years I needed it! Below is a screenshot from the TMC-1 configuration tool showings Owen's current keyboard layout. Hopefully I will be able to update this in the future - Owen has also promised photo's of his studio.

RM-6 - Print Master function and TFT Remote

The RM-6 is an established design and it is unusual to make major upgrades after over 13 years.

The Print Master function was added to the PD-1 after about 1 year, the function is simple, define one or more stems as a Print masters. If any stem enters record the printmaster stems also enters record, the Print master stems go out of record when all other tracks drop out of record. Thus any modification made to a stem is also recorded on the print master stem.

Not all consoles include the print master function in their Pec/Direct panel, to overcome this problem I added the printmaster function to the RM-6. At the same time I had to add a Printmaster macro to CBServer, CBServer3, and the new TFT Remote control for the RM-6. To enable/disable the printmaster setting is very simple.

To Enable:
1) Stop
2) Arm the print master tracks
3) Depress the Print master Macro Key
 the Print master macro key will illuminate and  the armed tracks will turn off.

To Disable
With no tracks armed depress the Print Master key

TFT Remote
We have now supplied 7 TFT panels 5 to upgrade existing RM-6 installations and 2 with a new RM-6 installation. The TFT-Remote is very versatile and can be used with existing remote panels, with CBServer and CBServer3. Multiple remotes can be used with the RM-6. The panel below includes 18 TFT keys, there advantage is that not only can the text displayed be changed with function but the illumination intensity and colour are also prograable.


TMC-1 major s/w update

When showing the TMC-1 to possible customers it became evident that there were many different requirements from a stereo music studio,  7.1 and even 80 channel Atmos and Auro.

To cope with this we have made the TMC-1 keyboard and display more user programable as well as providing a new Mac/Windows programming tool. The reaction from beta testers is very favourable.

Here is the new meters screen, all 8 of the keys below the screen are programable, their function is displayed at the bottom of the screen. `you cam also see the new input selection indicator.

Here is the Mac/Windows user key and naming screens